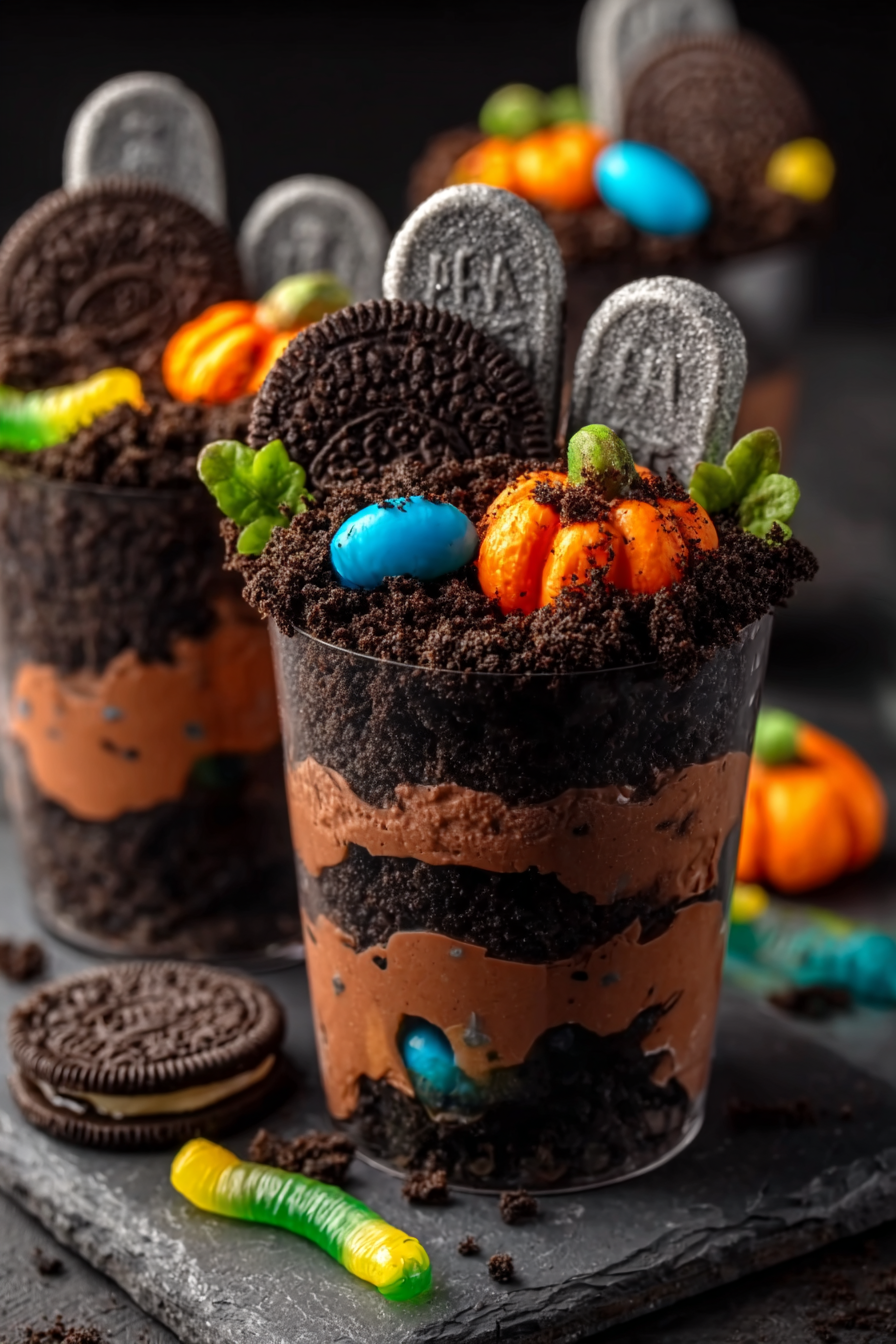
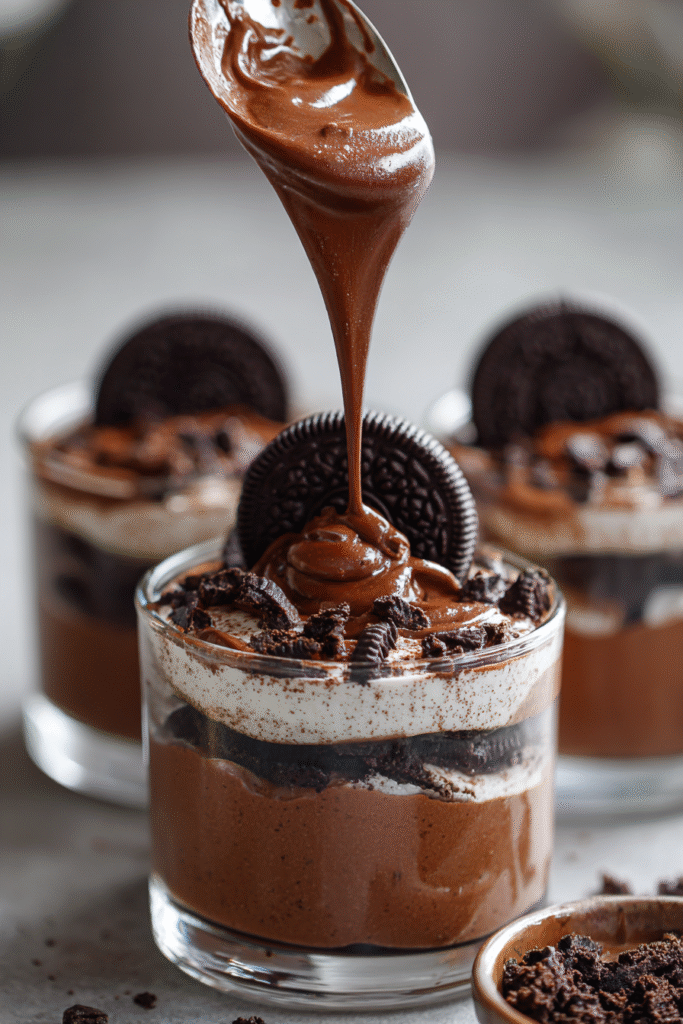
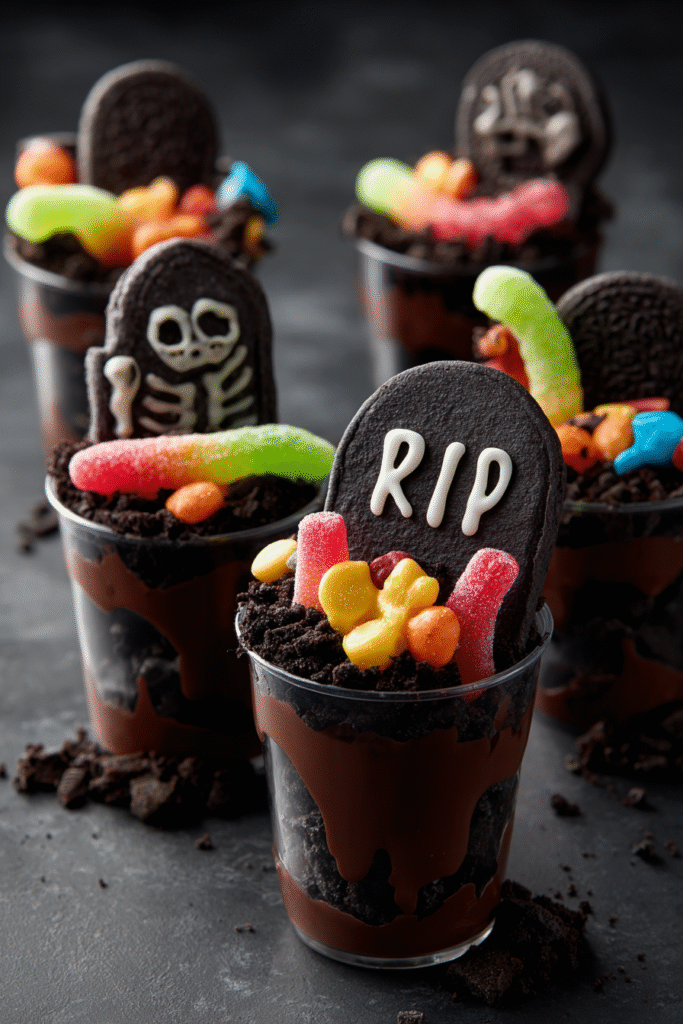
Chocolate Oreo “Graveyard” Pudding Cups are the ultimate no-bake Halloween dessert cups—creamy, crunchy, and playful with edible “tombstones” tucked into a field of cookie “soil.” This family-friendly treat layers silky chocolate pudding with crushed cookies and spooky toppings for a dessert that looks elaborate but assembles in minutes. Because they’re portioned into cups, these Chocolate Oreo Graveyard Pudding Cups are perfect for parties, school events, and neighborhood gatherings—festive, portable, and delightfully eerie. If you love themed sweets, you’ll also enjoy these easy seasonal bites: Halloween Chocolate Pretzel Spider Webs.
What Makes This Recipe Special
These Chocolate Oreo Graveyard Pudding Cups balance nostalgic flavor with a dramatic look. The texture contrast—smooth pudding, sandy crumbs, and crunchy details—makes every spoonful fun. The decorations are highly customizable, so kids can “build a graveyard” with gummy worms, candy corn pumpkins, or ghostly marshmallows. Plus, the cups chill quickly, travel well, and scale up for a crowd with zero fuss. If you’ve ever made classic “dirt cups,” think of this as the ultimate glow-up with a spooky theme.
Ideal Occasions to Serve It
Bring Chocolate Oreo Graveyard Pudding Cups to Halloween movie nights, trunk-or-treat tables, class parties, or October birthdays. They shine on dessert buffets and pair beautifully with savory Halloween snacks for balance. Because they’re make-ahead friendly, you can prep the elements the day before and assemble just before guests arrive for the freshest crunch.
Ingredients
Note: The full, precise amounts live in the Tasty recipe card below. This section offers guidance without listing the actual ingredients or steps.
Required Ingredients
For classic Chocolate Oreo Graveyard Pudding Cups, you’ll rely on a rich chocolate base, a dark, crumbly cookie “soil,” and a sturdy, cookie-like element to serve as the tombstone. A touch of dairy (or dairy-free alternative) ensures a fluffy, mousse-like lift, while vanilla deepens the cocoa notes. Choose standard clear party cups so the layered “graveyard” is visible.
Optional Additions or Substitutes
The beauty of Chocolate Oreo Graveyard Pudding Cups is flexibility. Go gluten-free with certified GF sandwich cookies and pudding mix, or dairy-free with almond/coconut-based whipped topping and plant milk. Intensify chocolate flavor with espresso powder, or add texture with mini chocolate chips. For decorations, think candy bones, gummy worms, chocolate rocks, or piped white chocolate “ghosts.” For more spooky inspo to pair on your table, peek at Mummy Hot Dog Pastry Wraps.
Step-by-Step Instructions
Find the detailed, numbered method in the Tasty recipe card below. Here, you’ll learn assembly strategy and timing rather than step specifics.
Preparation
Crush dark sandwich cookies until they resemble fine “dirt.” Whisk together the pudding base and give it time to thicken to spoonable velvet. Have cups, decorations, and a piping bag (or spoon) ready so you can layer cleanly for sharp lines. Let any cookie “tombstones” dry after writing names with edible marker or melted chocolate to prevent smudging.
Cooking Process
There’s no stovetop here—just chill time. Layer pudding and crumbs in alternating strata, finishing with a generous cookie “soil” cap. Press a decorated cookie “headstone” into each cup, then scatter candies to suggest pathways, mounds, or creeping critters. Chill until set enough to travel and hold shape. For another Halloween-friendly sweet to complete your spread, check out the swirly magic of Pumpkin Cheesecake Swirl Brownies.
Expert Tips and Variations
Cooking Tips from Chefs
- Texture wins: Aim for 2–3 layers so each bite mixes cream and crunch.
- Keep it glossy: Fold whipped topping gently to avoid deflating your pudding.
- Photogenic finish: Wipe the inside rim of cups between layers for clean lines.
- Party-proof: Assemble decorations just before serving if you want maximum crunch; cookie “soil” can soften after several hours.
Variations Based on Dietary Needs
- Gluten-free: Use certified GF chocolate sandwich cookies and a GF-labeled pudding mix.
- Dairy-free/vegan: Choose plant-based pudding, dairy-free whipped topping, and vegan cookies.
- Lower sugar: Opt for sugar-free pudding, “no added sugar” cookies, and dark chocolate decorations.
- Nut-free: Verify candy decorations are processed in nut-free facilities.
Nutritional Info & Storage
Calories and Macros
A standard party-size serving of Chocolate Oreo Graveyard Pudding Cups sits in the treat zone—think a dessert square rather than a whole slice of cake. Expect a moderate calorie count with carbs from cookies and pudding, fats from dairy elements, and a small amount of protein. Using lighter whipped topping or sugar-free pudding can trim totals without sacrificing fun.
Storage Instructions
Assembled Chocolate Oreo Graveyard Pudding Cups keep well covered in the fridge for 1–2 days. For the crispiest “soil,” store crumbs separately in an airtight container and assemble toppings just before serving. Avoid freezing; thawing can weep moisture and blur your graveyard scene. If you’re building a full Halloween dessert table, these cups pair perfectly with striking centerpieces like the festive Candy Corn Layer Cake.
For more recipes follow me in Facebook and instagram .
FAQs
Are Chocolate Oreo “Graveyard” Pudding Cups kid-friendly to assemble?
Absolutely—crushing cookies and placing tombstones is perfect for little helpers.
How far ahead can I make them?
You can prep components 24 hours ahead and assemble cups 2–4 hours before serving for best texture.
What if I don’t have edible markers?
Pipe names with melted chocolate in a zip-top bag; chill to set before inserting.
Can I scale the recipe for a crowd?
Yes—double or triple the base and set up a DIY topping bar so guests design their own grave plots.
How do I keep layers neat?
Use a piping bag or snip a corner of a freezer bag to pipe the pudding cleanly.
Conclusion
Creepy-cute, quick, and wildly customizable, Chocolate Oreo Graveyard Pudding Cups deliver maximum Halloween vibes with minimal effort. They’re the kind of treat guests photograph before devouring—silky pudding, dramatic dark “soil,” and charming tombstones in every cup. Try them this weekend, share your spooky designs, and tell us how you served them alongside favorites like that towering Candy Corn Layer Cake. Happy haunting!
Chocolate Oreo “Graveyard” Pudding Cups
- Total Time: 45 minutes
- Yield: 10 cups 1x
- Diet: Vegetarian
Description
Chocolate Oreo “Graveyard” Pudding Cups are a spooky-cute, no-bake Halloween dessert: silky chocolate pudding, crunchy cookie “soil,” and edible tombstones with gummy worms creeping through every bite. Fast to assemble, kid-friendly, and perfect for parties.
Ingredients
- 2 (3.9 oz / 110 g) boxes instant chocolate pudding mix
- 4 cups (960 ml) cold milk (or plant milk)
- 2 cups (240 g) whipped topping or dairy-free whipped topping
- 36 chocolate sandwich cookies, finely crushed (about 3 cups crumbs)
- 10 chocolate sandwich cookies, whole (for tombstones)
- 1 tsp vanilla extract
- 1/2 tsp espresso powder (optional, for deeper chocolate flavor)
- Pinch of fine salt
- Assorted candies: gummy worms, candy bones, candy pumpkins
- Edible marker or 2 oz (60 g) melted chocolate (for writing “RIP”)
- 10 clear plastic cups (8–9 oz / 240–270 ml)
Instructions
- In a large bowl, whisk pudding mix with cold milk for 2 minutes until thick and glossy. Let stand 5 minutes to fully set, then fold in whipped topping, vanilla, and espresso powder (if using) with a pinch of salt.
- Place 36 sandwich cookies in a food processor and pulse to fine crumbs (or crush in a zip-top bag with a rolling pin). Reserve a handful of chunkier bits for texture.
- Create tombstones: write “RIP” on the 10 whole cookies with an edible marker, or pipe letters with melted chocolate. Let set until dry and firm.
- Layer the cups: add 2–3 tablespoons cookie crumbs to each cup, spoon or pipe a layer of pudding, repeat once more, then finish with a generous “soil” cap of crumbs on top.
- Insert a tombstone cookie into each cup, add gummy worms and candy bones, and chill 30 minutes to set. Serve cold for best layers and crunch.
Notes
- Make-ahead: Keep pudding and crumbs separate up to 24 hours; assemble 1–3 hours before serving for the crispiest “soil.”
- Dietary swaps: Use certified gluten-free sandwich cookies and GF pudding mix; choose dairy-free whipped topping and plant milk for a vegan-friendly version.
- Presentation tip: Wipe the inside rim of cups between layers for clean, photogenic stripes.
- Scaling: Double everything for 20 cups; set up a DIY topping bar so guests decorate their own grave plots.
- Prep Time: 15 minutes
- Cook Time: 0 minutes
- Category: Dessert
- Method: No-Bake & Chilling
- Cuisine: American
Nutrition
- Serving Size: 1 cup (8–9 oz)
- Calories: 280
- Sugar: 25 g
- Sodium: 220 mg
- Fat: 12 g
- Saturated Fat: 6 g
- Unsaturated Fat: 5 g
- Trans Fat: 0 g
- Carbohydrates: 40 g
- Fiber: 2 g
- Protein: 4 g
- Cholesterol: 10 mg