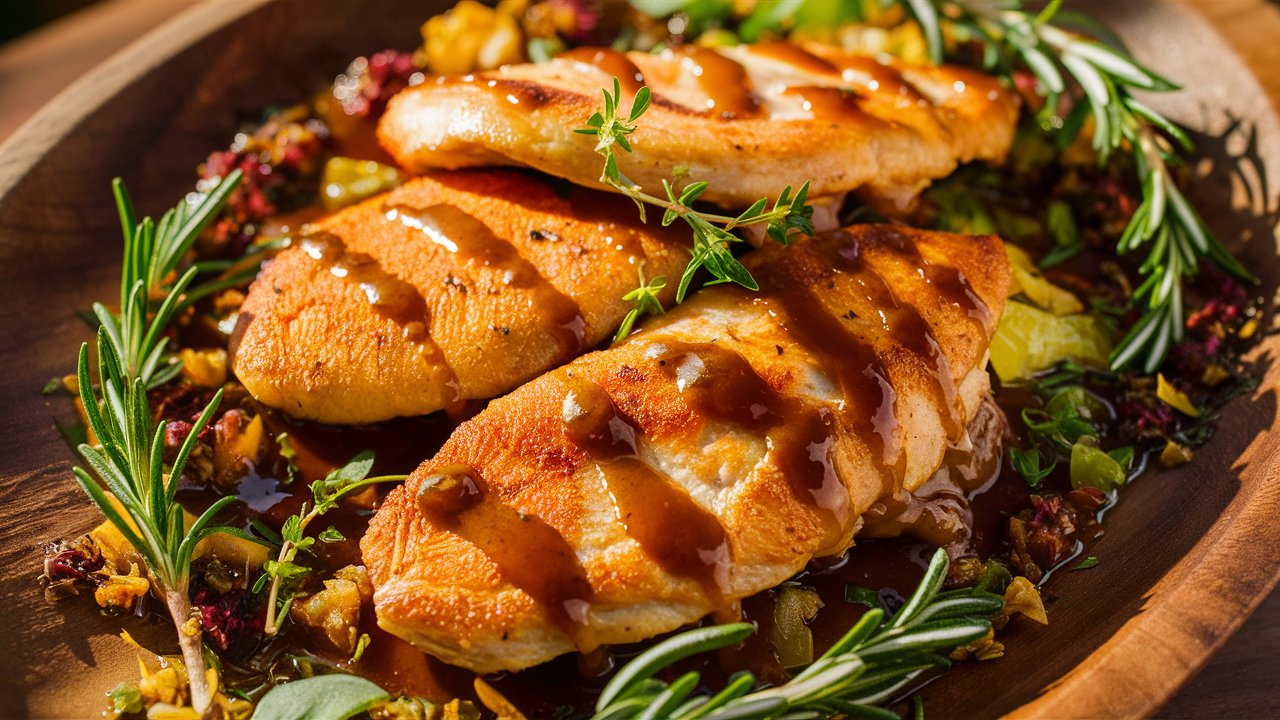
Introduction to Perfectly Breaded Chicken Cutlets
Cooking the perfect chicken cutlet can seem simple, yet many cooks know the frustration of watching breading fall off in the frying pan. Achieving a golden, crispy exterior while keeping the breading intact is a common challenge. Many elements must align perfectly, from the dryness of the chicken to the heat of the oil. To master this culinary feat, it’s essential to understand the factors at play and implement effective techniques. In this article, we’ll explore how to make chicken cutlets without breading falling off, addressing key aspects such as chicken preparation, breading methods, and cooking techniques.
Why Technique Matters
Proper technique and preparation are crucial. The breading process involves coating chicken in flour, eggs, and breadcrumbs. This crust adds texture and seals in the chicken’s juices. But if you don’t handle these steps correctly, the breading can detach during cooking, leaving the meat bare and the pan full of loose crumbs.
Key Factors for Breading That Stays Put
Dry and evenly flattened chicken breasts provide a better surface for the breading. The consistency of the flour and eggs helps these coatings act as glue for the breadcrumbs. The choice of breadcrumbs also affects the outcome. For example, panko tends to adhere better and gives a crunchier texture than traditional breadcrumbs.
The Right Cooking Method and Temperature
It’s also vital to fry at the correct temperature. If the oil is too cool, the breading can soak up oil and become soggy, which might cause it to peel off. On the other hand, excessively hot oil can burn the breading before the inside is done.
Perfecting Your Technique
In the next sections, we’ll explore each preparation step in detail. You’ll learn to master the art of breading with tips and techniques for each stage—from preparing the meat to the final cooking. These methods will help you achieve consistently well-breaded cutlets, enhancing both flavor and presentation.
Preparing Your Chicken Cutlets
Selecting the Right Chicken
When aiming to create perfect chicken cutlets, the selection of the chicken itself plays a pivotal role. Not all types of chicken are suitable for cutlets, and choosing the right type can make a significant difference in both taste and texture.
Best Types of Chicken for Cutlets
The ideal choices for chicken cutlets are boneless, skinless chicken breasts or thighs. These cuts are naturally lean, providing a firm texture that holds up well under the breading and frying process. Chicken breasts are the most popular choice due to their uniform shape and thickness, which help in cooking evenly. Thighs, however, can also be used for those who prefer a juicier cutlet due to their higher fat content.
Importance of Chicken Quality
The quality of the chicken also affects the final outcome of your cutlets. High-quality chicken — preferably organic or free-range — tends to have a better flavor and texture. These chickens are often raised with better diets and more humane living conditions, which directly influences the quality of their meat.
Choosing fresh chicken over frozen is another crucial factor. Fresh chicken is less likely to contain excess moisture, which is a common issue with frozen chicken that can cause the breading to become soggy. If using frozen chicken, ensure it is thoroughly defrosted and dried before beginning the breading process.
Preparing the Chicken
Once you have selected the right type and quality of chicken, preparing it correctly is the next step. Begin by trimming any excess fat and tendons from the chicken pieces. This not only improves the texture but also prevents the chicken from curling up during cooking, which can cause uneven cooking and breading coverage.
Flattening the chicken to an even thickness is crucial. Use a meat mallet or rolling pin to gently pound the chicken between two pieces of plastic wrap. Aim for a thickness of about 1/2 inch. This uniformity in thickness helps in cooking the chicken evenly, ensuring that the entire cutlet cooks at the same rate and the breading does not burn while waiting for thicker parts to cook through.
In the following sections, we will delve deeper into the breading process itself, giving you tips on how to ensure that each piece of chicken is perfectly coated and ready for frying.
Preparing the Meat
Trimming Fat and Tendons for Optimal Cooking
Before you start breading, it’s crucial to prepare your chicken properly to achieve the best results. Begin by trimming any excess fat and tendons from the chicken breasts. This step is vital because fat and tendons can make the chicken cook unevenly and might prevent the breading from sticking properly.
Use a sharp knife to carefully cut away any white fat and the tough silver skin. Removing these parts ensures a smoother surface that will more effectively hold the breading. Also, it prevents the chicken from curling up during cooking, which can pull the breading off.
Ensuring Even Cooking by Pounding the Chicken
The next essential preparation step is to pound the chicken to an even thickness. This uniformity in thickness prevents the chicken from cooking unevenly, which is crucial for keeping the breading intact. If parts of the chicken cook at different rates, the breading might crack or peel off the less cooked areas.
To pound the chicken, place each piece between two layers of plastic wrap or inside a heavy-duty freezer bag. Using a meat mallet or rolling pin, gently flatten the chicken from the center outwards. Aim for a consistent thickness of about 1/2 inch. This not only helps the chicken cook evenly but also increases the surface area for the breading, which enhances the crispiness.
Ready for Breading
With the chicken now properly trimmed and flattened, you can proceed to the next phase with confidence. In the upcoming section, we will cover the breading process in detail. Here, you’ll learn how to ensure that your breading not only sticks but also adds a perfect crunch to your chicken cutlets.
Drying the Chicken
The Crucial Step of Patting the Chicken Dry
Before moving on to the breading process, one critical preparation step that must not be overlooked is drying the chicken thoroughly. This step is essential for ensuring that the breading adheres properly to the chicken cutlets.
Why Drying Matters
Moisture is the enemy of a good breading. If the chicken surface is wet, it will make the flour clumpy and prevent the eggs and breadcrumbs from sticking evenly. This can lead to patchy breading that may peel off during cooking.
How to Dry the Chicken
To properly dry the chicken, take each piece and pat it dry using paper towels. Apply gentle pressure to absorb as much moisture as possible. Ensure you cover both sides and all edges of each chicken piece to remove any excess water.
This action not only helps in achieving an even coating of flour and breadcrumbs but also improves the overall texture of the cooked cutlet. A dry chicken surface means a crispier breading that stays attached throughout the cooking process.
With the chicken now dry, you’re set to start the breading process, where every step is designed to maximize flavor and texture. We’ll explore this in detail in the next section, focusing on techniques to ensure your breading is perfect every time.

Basic Seasoning Options and Techniques
When it comes to seasoning chicken cutlets, there are countless options to enhance their flavor. Here are some basic seasoning options and techniques to consider:
Salt and Pepper: Salt and pepper are essential for seasoning chicken cutlets. Season both sides of the cutlets generously with salt and freshly ground black pepper to enhance their natural flavors.
Garlic Powder: Garlic powder adds a savory and aromatic flavor to chicken cutlets. Sprinkle a light layer of garlic powder on both sides of the cutlets for added depth of flavor.
Herbs and Spices: Experiment with herbs and spices to customize the flavor of your chicken cutlets. Some popular options include thyme, rosemary, paprika, and cayenne pepper. Mix your desired herbs and spices together and rub them onto the chicken cutlets for a flavorful seasoning blend.
Marinating: Marinating chicken cutlets is another way to infuse them with flavor. Prepare a marinade using ingredients such as olive oil, lemon juice, soy sauce, and herbs. Place the chicken cutlets in the marinade and refrigerate for at least 30 minutes or up to overnight before cooking.
The Resting Period Before Breading
Before breading the chicken cutlets, it’s essential to allow them to rest for a short period. Here’s why the resting period is important:
Flavor Infusion: Allowing the seasoned chicken cutlets to rest for 10-15 minutes before breading allows the seasonings to penetrate the meat, resulting in a more flavorful end product.
Moisture Absorption: During the resting period, the chicken cutlets will absorb any excess moisture on the surface, which helps the breading adhere better during the breading process.
Temperature Equilibrium: Resting the chicken cutlets at room temperature for a short period allows them to come to an even temperature, which promotes more even cooking when they are pan-fried, baked, or air-fried.
By seasoning your chicken cutlets with a variety of herbs and spices and allowing them to rest before breading, you can ensure that they are flavorful, tender, and perfectly seasoned every time.
Breading Process
Preparation of Ingredients Before you begin the breading process for your chicken cutlets, it’s essential to gather and prepare all the necessary ingredients. Here’s what you’ll need:
Chicken Cutlets: Ensure that your chicken cutlets are trimmed and dried, as per the earlier steps outlined in the preparation process.
Breading Components:
- Flour: Use all-purpose flour as the base for your breading. Season the flour with salt, pepper, and any additional herbs or spices for added flavor.
- Egg Wash: Prepare a mixture of beaten eggs and a splash of milk or water in a shallow bowl. Season the egg wash with salt and pepper for extra flavor.
- Breadcrumbs: Choose your preferred type of breadcrumbs, whether plain, seasoned, or Panko-style, to coat the chicken cutlets for a crispy exterior.
Setting up Your Breading Station Creating an organized breading station will streamline the breading process and ensure that everything is within reach. Follow these steps to set up your breading station:
Three-Step Breading Setup:
- Place the seasoned flour in a shallow dish or plate.
- Set the bowl of egg wash next to the flour.
- Finally, place the breadcrumbs in another shallow dish or plate.
Order of Operations: Arrange your breading station in a logical sequence, starting with the seasoned flour, followed by the egg wash, and ending with the breadcrumbs. This ensures a smooth and efficient breading process.
Seasoning Your Flour and Preparing Egg Wash Proper seasoning of the flour and egg wash is key to ensuring that your chicken cutlets are well-seasoned throughout. Here’s how to season each component:
Seasoning the Flour:
- Add salt, pepper, and any desired herbs or spices to the all-purpose flour.
- Use a fork or whisk to combine the seasonings evenly throughout the flour.
Preparing the Egg Wash:
- Crack the eggs into a bowl and beat them until well-combined.
- Add a splash of milk or water to the beaten eggs and whisk together.
- Season the egg wash with salt and pepper to taste, ensuring that the seasoning is evenly distributed.
By properly preparing your ingredients and setting up your breading station, you can ensure a smooth and successful breading process for your chicken cutlets, resulting in a crispy and flavorful final product.
Dredging
Detailed Steps for Flour, Egg Wash, and Breadcrumb Coating Properly dredging chicken cutlets in flour, egg wash, and breadcrumbs is essential for achieving a crispy and flavorful coating. Follow these detailed steps for each component:
Flour Coating:
- Place the seasoned flour in a shallow dish or plate.
- Dredge each chicken cutlet in the flour, ensuring that it is evenly coated on all sides.
- Shake off any excess flour to prevent clumps in the breading.
Egg Wash:
- Dip the floured chicken cutlet into the prepared egg wash, ensuring that it is fully submerged.
- Allow any excess egg wash to drip off before proceeding to the next step.
Breadcrumb Coating:
- Transfer the egg-coated chicken cutlet to the dish of breadcrumbs.
- Press the breadcrumbs onto the chicken cutlet, ensuring an even coating on all sides.
- Gently pat the breadcrumbs onto the chicken to help them adhere.
Tips for Ensuring the Breading Sticks To ensure that the breading sticks to the chicken cutlets during cooking, consider the following tips:
Patting Dry: Before dredging the chicken in flour, ensure that it is thoroughly dried to remove any excess moisture. This helps the flour adhere better to the surface of the chicken.
Firm Pressing: When coating the chicken cutlets in breadcrumbs, apply firm pressure to ensure that the breadcrumbs adhere well to the egg wash. This helps create a crispy and uniform coating.
Chilling Time: After breading the chicken cutlets, allow them to chill in the refrigerator for 15-30 minutes before cooking. This brief resting period helps the breading set and adhere to the chicken, preventing it from falling off during cooking.
Resting the Breaded Cutlets
Importance of Letting Breaded Cutlets Rest Before Cooking Resting breaded cutlets before cooking is a crucial step that should not be overlooked. Here’s why it’s important:
Allows Breading to Set: Resting the breaded cutlets in the refrigerator for a short period allows the breading to set and adhere firmly to the chicken. This helps prevent the breading from falling off during cooking, resulting in a crispier and more evenly coated chicken cutlet.
Enhances Flavor Infusion: During the resting period, the seasoned flour, egg wash, and breadcrumbs have time to meld together, allowing the flavors to infuse into the chicken. This results in a more flavorful end product.
Promotes Even Cooking: Chilling the breaded cutlets before cooking helps them maintain their shape and prevents them from becoming soggy. This promotes more even cooking and ensures that the chicken cutlets are cooked to perfection.
By allowing breaded cutlets to rest before cooking, you can ensure that they are crispy, flavorful, and evenly cooked, making for a delicious meal every time.
Cooking Your Chicken Cutlets
Frying Chicken Cutlets Frying chicken cutlets is a popular cooking method that results in a crispy exterior and juicy interior. Follow these steps for successful frying:
Oil Selection and Temperature Management
- Choose a high smoke point oil such as vegetable oil, canola oil, or peanut oil for frying.
- Heat the oil in a heavy-bottomed skillet or frying pan to 350-375°F (175-190°C) for optimal frying temperature.
Techniques for Frying Without Losing Breading
- Carefully lower the breaded chicken cutlets into the hot oil, making sure not to overcrowd the pan.
- Fry the cutlets in batches if necessary to maintain consistent oil temperature and prevent overcrowding.
- Avoid flipping the chicken cutlets too frequently to prevent the breading from falling off. Allow each side to cook until golden brown and crispy before flipping.
Baking Chicken Cutlets Baking chicken cutlets is a healthier alternative to frying that still results in a crispy exterior. Follow these steps for baking chicken cutlets:
Preparing for Baking, Setting Temperatures
- Preheat your oven to 400°F (200°C) and line a baking sheet with parchment paper or aluminum foil for easy cleanup.
- Place the breaded chicken cutlets on the prepared baking sheet, ensuring they are evenly spaced apart for even cooking.
Benefits of Baking Over Frying
- Baking chicken cutlets requires less oil compared to frying, making it a healthier cooking option.
- Baking allows the chicken to cook evenly on all sides without the need for flipping, resulting in a tender and juicy interior.
Air Frying Chicken Cutlets Air frying is another healthy cooking method that produces crispy chicken cutlets with minimal oil. Follow these steps for air frying chicken cutlets:
How to Air Fry Effectively
- Preheat your air fryer to 375°F (190°C) for 3-5 minutes before adding the chicken cutlets.
- Place the breaded chicken cutlets in the air fryer basket in a single layer, ensuring they are not overcrowded.
Adjustments for Air Frying vs. Traditional Methods
- Air frying requires less oil than traditional frying methods, resulting in healthier chicken cutlets.
- Adjust cooking times and temperatures as needed when air frying compared to traditional frying or baking methods to ensure the chicken cutlets are cooked evenly and to your desired level of crispiness.

FAQs
Common Questions About Making Chicken Cutlets
1. How to Keep Breading From Falling Off
- Answer: To prevent breading from falling off chicken cutlets, ensure that the chicken is dry before breading, use a proper dredging technique, and allow the breaded cutlets to rest before cooking.
2. Best Oils for Frying
- Answer: High smoke point oils such as vegetable oil, canola oil, and peanut oil are best for frying chicken cutlets as they can withstand high temperatures without burning.
3. Gluten-Free Breading Options
- Answer: For gluten-free breading options, consider using alternatives such as almond flour, gluten-free breadcrumbs, crushed cornflakes, or grated Parmesan cheese.
4. Ideal Cooking Times and Temperatures
- Answer: Cooking times and temperatures vary depending on the cooking method and thickness of the chicken cutlets. As a general guideline, fry chicken cutlets for 3-4 minutes per side at 350-375°F (175-190°C), bake at 400°F (200°C) for 20-25 minutes, or air fry at 375°F (190°C) for 10-12 minutes, flipping halfway through cooking. Use a meat thermometer to ensure the internal temperature reaches 165°F (74°C) for fully cooked chicken. Adjust cooking times as needed based on the thickness of the cutlets.
World Health Organization (WHO) – Food Safety: https://www.who.int/foodsafety/en/